People often ask "What's the best way to learn programming on the Palmtop?" My answer depends on your reason for wanting to learn programming.
If you want to create programs that have the look and feel of the Palmtop's built-in applications, your best bet would be to start with Rob Koenis's LXBatch programming language.
We featured this programming tool in both the Jan/Feb and Mar/Apr, 1998, issues of The HP Palmtop Paper.
Once you've discovered what LXBatch programming is like, you can forge ahead and learn C with the PAL library of Palmtop functions. Be aware, however, that by the time you master C the "look and feel" of the Palmtop will have faded into history.
If your goal is to make a lot of money doing programming then forget about the Palmtop and learn COBOL and Java. You'll spend a lot of time and money moving up this learning curve but at the end you'll be a "professional" programmer.
On the other hand, if you want to discover whether or not you'd enjoy programming then I'd suggest trying the computer language called Logo.
Why Logo?
The answer to "why Logo?" is simple: programming in Logo is fun. Logo has "instant gratification" built into it.
When you give a Logo command to a computer you see something happen on the screen almost instantly. You don't have to go through a process of compiling and debugging a lot of computer code before you get something to work.
Isn't Logo Just For Kids?
Yes: Logo is for kids but I like to think that Logo is for the kid in all of us.
I've watched pre-schoolers get hooked on Logo as if it were a computer game.
I've also watched advanced pre-schoolers (i.e., college graduates) get addicted to Logo and discover a talent they never knew they had.
True: Logo was popular in elementary schools during the 1980's but Logo has grown up and is now taught at several colleges and universities.
True: you won't find any mission critical applications written in Logo. However you will find an active community of Logo programmers at various sites on the World Wide Web. You'll also find references to some of the brightest minds in the fields of computer science and education..
True: programming in Logo won't make you any money but then you won't have to spend any money for college courses and books. Everything you need to learn Logo is free. There are three versions of the language that you can use on your Palmtop. There are also versions of Logo available for Windows, Macintosh or Unix desktops. There are electronic books, articles, tutorials and plenty of sample programs: all free.
Try It Yourself
Included on this issue's The HP Palmtop Paper On Disk as well as on our Web site, www.Palmtop Paper.com, is a copy of Ladybug Logo. This is the smallest version of Logo that we could find.
Ladybug Logo runs well on the HP Palmtop and will even run in a DOS session under System Manager. We don't recommend this since Ladybug will take over the serial port and mess it up. The best way to run Ladybug Logo is to exit System Manager altogether either by using the More Menu A T and Enter command or switching to a separate DOS session if you're using Software Carousel.
If you want to follow along with this article, get a copy of Ladybug. To install it on the Palmtop just transfer the files in the LADYBUG.ZIP file to a single directory on your Palmtop.
To run the program leave System Manager and switch to the drive and directory where you stored the Ladybug files. At the DOS prompt type Ladybug and press Enter.
The opening screen will ask : "Do you have an IBM monochrome display too?" Press N and then press Enter twice.
The first thing you'll notice is that Ladybug Logo uses a 40 X 25 display for both text and graphics.
The opening screen tells you to press the F3 function key and then press Enter to get Help.
Many people will press F3 and wait for something to happen. Nothing will happen however until you press Enter.
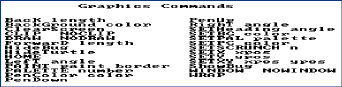
The eight help screens in Ladybug merely give the name of the built in commands. For example, if you press "1", you'll see the graphics commands shown in Screen 1. To leave the help menu, press any key other than '0' to avoid getting a fake error message.
Screen 1: Graphics Commands in Logo
You can find a lot more help in the LADYBUG.LST text file on your Palmtop..
The Logo Prompt
The question mark is Logo's way of asking you "what do you want to do today?"
If you want to quit, the command is "bye" (without any quotes.) followed by the Enter key.
Some Things to Try
If you do nothing else with Ladybug Logo be sure to use the following command just for fun.
Type
load tutor
and press Enter. The message that appears asks for a "slow-down-factor." Use 10 on a double speed Palmtop and 5 on a standard Palmtop. Press Enter and you'll start a tutorial about Ladybug Logo (Screen 2).
Screen 2: From the Logo Tutorial
The tutorial will occasionally ask you to type NEXT or MORE and prompt you for the "slow-down-factor." The tutorial takes about 20 minutes to demonstrate almost all of the Ladybug commands.
The tutorial will end abruptly with a "File not found" error message. Perhaps the author of the tutorial didn't complete the last part or forgot to include it in the package: who knows?
Programming Concepts
The Ladybug Tutor program will give you a good introduction to the scope of the language. However learning about a computer language isn't programming.
Programming itself starts with a few concepts and implements them by means of a computer language.
Here's my brief explanation of these concepts.
Every computer program is like an action-story.
In programming, you create a story that is made up of actions and then you tell the computer to memorize your story.
Once that's done, you tell the computer to replay the story and carry out the actions. This is true for every program whether the action-story makes the computer help you write a letter, calculate a budget, send e-mail, or play a shoot-em-up game. The computer just replays the action-story and does what you told it to do. (You won't ever write such elaborate action stories with Logo. For those stories you'll need a more complex language such as C++.)
As in ordinary writing, every story is made up of words.
Ladybug Logo knows the meaning of a few "primitive" words. It teaches your Palmtop these words when you start the Ladybug "action-story" itself. If you need more words you can define them and teach them to the computer.
Besides having a few words, the computer has a set of rules for using these words. In most languages this is called the syntax.
Once you've learned some of the words and a little bit of the syntax you can begin to write "sentences" and see if the computer can make sense of them. (Other instructors call these sentences "statements".)
When you have a handle on writing sentences you can combine several of them to make a paragraph. (Other computer instructors call paragraphs "functions".) Your rhetoric teachers undoubtedly told you that a well written paragraph should have only one idea. The same is true for "computer paragraphs." Keep your computer-paragraphs short and simple.
Programming Strategies
1. Decide What Actions You Want The Computer To Do
The first and most important task in programming is to decide what action-story you want to create.
You don't have to know anything about a computer language to do this step. You just have to be very specific about what you want the computer to do when it replays your story.
If you throw words and sentences at the computer in a haphazard fashion something will happen (often disastrously). You might "hack" your way to a good story but so could ten thousand monkeys banging on their Palmtop keyboards.
2. Create an Outline
This is the second step in programming. The idea is to write an outline of what you want the computer to do. It doesn't have to contain all the details but it should give an accurate summary of the action-story. In a computer course this outline might be called "pseudopodia". Alternatively, if you want to create a diagram of the story use a flowcharting program. ( For example you could use the recently rediscovered FLOWDRAW program on your Palmtop.)
3. Fill In the Details
When you're satisfied with your outline you can use it as the basis for the computer-sentences that will make things happen on the HP Palmtop.
Ladybug Logo provides a couple of tools to help you with this task of "coding" your actions.
The first tool is a "sentence-builder" that lets you type a computer sentence at the Logo question mark and press Enter. Ladybug will immediately show you what the computer does in response to your sentence or it will give you an error message.
Logo's error messages are cryptic but non-judgmental. They usually say something like "I don't know how to subtract."
The second tool is a "paragraph builder". It will let you combine several sentences into a paragraph and give the paragraph a name. The command to start the paragraph builder is
TO para-name
where para-name is the name you give the paragraph. To stop building a paragraph you use the command END. What if you later discover a mistake in a paragraph?
Ladybug provides a built-in editor that you run with the "ED Para-name" command. The built-in editor is weak by today's standards but it works. It will let you correct any typing mistakes.
Screen 3 shows a typical editing session. The bottom line on the screen shows that the F9 key will save your work and take you back to the Logo prompt.
![]()
Screen 3: The Built-In Logo Editor
On the Palmtop you can exit Ladybug altogether and use PalEdit or Memo as your editor. However, before doing this, save your paragraph with the SAVE Para-name command.
Paragraphs As Building Blocks
The best strategy for creating complex action stories is to work with paragraphs. Keep the paragraphs simple. Get each one working the way you want and then write a separate paragraph that tells the other paragraphs to do their actions.
4. Test Your Action-Story
The final step in the process is to test your action-story. If it doesn't do exactly what you want it to you can always return to a previous step in the process and make corrections or refinements.
A Logo Example
To see how this all fits together we'll use a simple example. Our action-story will get the computer to draw a "smiley face" on the screen. The task sounds trivial. You could do this with any number of drawing programs. That's not the point: we want to make the idiot computer draw the picture. In other words we want to create an action-story, tell it to the computer and get the computer to replay it upon demand.
Decide What You Want to Have Happen
To get started, take a piece of scrap paper and a pencil and draw a "smiley face" that might look something like Screen 4. By doing this we've got a good idea of what we want the computer to draw.

Screen 4: Freehand Smiley
Now imagine that you have to tell a machine how to draw this face.
Here are some of the steps you might tell the computer
1. Draw a large circle.
2. Inside the circle draw a left eye using a small circle and fill in the circle.
3. Do the same for the right eye.
4. Draw an arc for the mouth.
These instructions might be acceptable for a child but the computer is not smart enough to deal with this. It has no idea what you mean by "arc" or "circle" let alone "eye" or "mouth".
If you want to use a new word you have to define it for the computer and make sure the computer understands what you mean. In this example we need to define "arc". We can define a "circle" as a closed arc.
We'll also have to tell the computer when to raise and lower the pen and where to put the eyes and the mouth. Here's a more complete outline:
1.Define an action word "draw.arc" that will...
get the center point of an arc or circle. The values x and y refer to positions on the screen at which the center of the arc or circle will be located.
get the radius of the arc
get the starting angle of the arc relative to the center point
get the angle though which the arc will sweep
use "value-holding-words" (variable names) on the same line as the paragraph name to pass this information into the paragraph
tell the turtle to raise the pen
point the turtle in the direction where the arc will begin
move the turtle in that direction for a distance given by :radius
turn the turtle so it points in the direction the arc will go
compute an :amt by which the turtle will move for each 1 degree of arc and save this in the variable "amt
put the pen down
repeat the two commands: forward :amt and right 1 for a number of times given by :angle
raise the pen
put the turtle at the center of the arc or circle
2. Define the paragraph called "draw.circle." that will...
refer to the "draw.arc" word and tells it to start drawing the arc at 0 degrees and sweep out an arc of 360 degrees
3. Prepare the computer with an "Init" paragraph that will...
clear the screen
put the turtle at the center of the screen
set the turtle's pen UP
4. Define a "draw.face" paragraph that will...
tell the turtle to draw a circle whose center is at the 0 0 coordinated of the screen with a radius of 100 and 360 degrees of arc
5. Define a paragraph "draw.eye" that will...
tell the turtle to draw a circle at :x = -40 and :y = 25
tell the turtle to fill the circle
6. Position the turtle for the right eye.
Tell the turtle to draw and fill in this eye at :x = 40 and :y = 25
7. Define a "draw.mouth" paragraph that will...
position the turtle for the start of the mouth
draw an arc that is centered at 0 0 on the screen, has a radius of 70, starts at 120 degree and sweeps an arc of 120 degrees
8. Define a paragraph called "TO smiley" that will...
initialize the computer
draw an outline of a face
draw the left and right eyes
draw a mouth
With this more complete outline in hand we can translate the English statements into Logo statements and paragraphs. The end result will be an action-story.
The Logo Encoded Story
The sidebar shows the actual code that will get the computer to draw a smiley face. Once you have Ladybug Logo working on your Palmtop use your favorite editor to key in the code as shown and save the file as SMILEY.BUG in the same directory that contains the rest of the Ladybug files. Start Ladybug and type the command
Load Smiley
and then press Enter. Type the single word
Smiley
and press Enter and see if you get the desired results.
When you type in the code, be aware that the first line starts with the word "to" and ends with the word ":angle". Be careful how you key in the sentence
make "amt :radius * tan 1.
There are spaces on either side of the multiplication sign "*". They need to be there or you'll get an error message. The colons before some letters or words tell the computer that this is the name of a place in its memory where there is a value (i.e., a variable.)
We could have written this action story in one large paragraph. However breaking the code into small paragraphs will let you use the command EDIT Para-name rather than the EDIT ALL command. That way you can work with a small amount of code rather than having to scroll up and down through all the code.
Your Task
You may discover a few typing mistakes. To correct these use the "Edit para-name" or "Ed All" command and use the built-in editor. Be sure to press F9 when you've finished making any changes.
As an additional challenge, see if you can make the smiley face frown rather than smile
On this issue's The HP Palmtop Paper on Disk. there is another version of the program. That version uses variables instead of numbers. Loading and running this version of the program will let you adjust the size of the smiley face to make it larger or smaller. The file is called SMILEYB.BUG and you can use the command "Load Smileyb" to bring the file into Ladybug and any of the commands: Smiley 1, Smiley .5 or Smiley 1.5 to run the program.
Summing Up
The Logo language is a good way to introduce the ideas of programming. The one example we've used may be childish. I'd rather refer to it as "child-like". Hopefully it will let you experience the child-like fascination of creating something new and unusual in your Palmtop.